
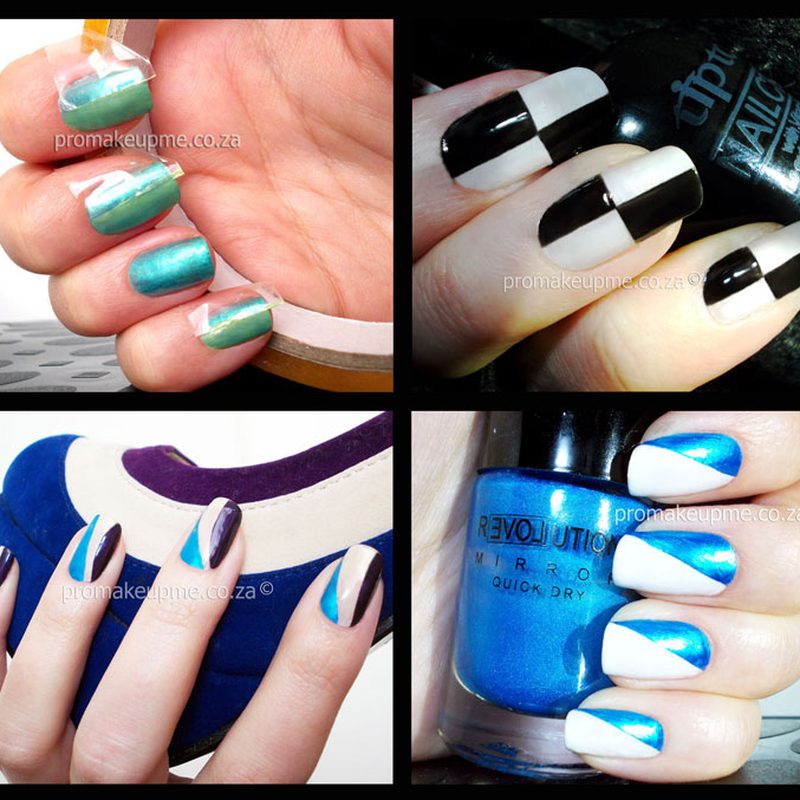
When it comes to elevating your manicure, precision and creativity are key. Nail art scotch tape offers an accessible way to achieve professional-looking nail designs without the hassle of complicated tools or techniques. Whether you’re a nail salon regular or a DIY enthusiast, mastering this simple accessory can unlock countless stylish looks. From crisp lines to bold geometric patterns, nail art scotch tape helps you create flawless, eye-catching nails that stand out. In this article, we explore the best ways to use nail art scotch tape, tips for beginners, and some inspiring design ideas to try at home or in the salon.
In this article:
- Why Nail Art Scotch Tape is a Must-Have for DIY Manicures
- Step-by-Step Guide to Using Nail Art Scotch Tape
- Top Nail Art Scotch Tape Design Ideas to Try Now
- Common Mistakes When Using Nail Art Scotch Tape and How to Avoid Them
- Choosing the Right Tape and Polish for Perfect Nail Art Scotch Tape Designs
Why Nail Art Scotch Tape is a Must-Have for DIY Manicures
Nail art scotch tape has rapidly gained popularity in the beauty community for its ease and versatility. Unlike intricate brushes or stamping kits, tape requires minimal skill and offers maximum control over your design. It acts as a guide for clean, sharp edges and geometric shapes, elevating simple polish into intricate art. This accessibility makes it perfect for beginners eager to experiment without the fear of messy results.
Additionally, scotch tape is widely available and affordable, meaning you can keep it as a staple in your nail toolkit without breaking the bank. It pairs seamlessly with different polish types—from mattes to shimmers—and can be layered for complex effects. As a bonus, it reduces cleanup time by protecting areas of your nail during polish application, helping you achieve salon-quality looks at home.
For inspiration beyond tape designs, check out our guide on Nail Art Stickers Decals: Elevate Your Manicure Style for other ways to enhance your nails.
Step-by-Step Guide to Using Nail Art Scotch Tape
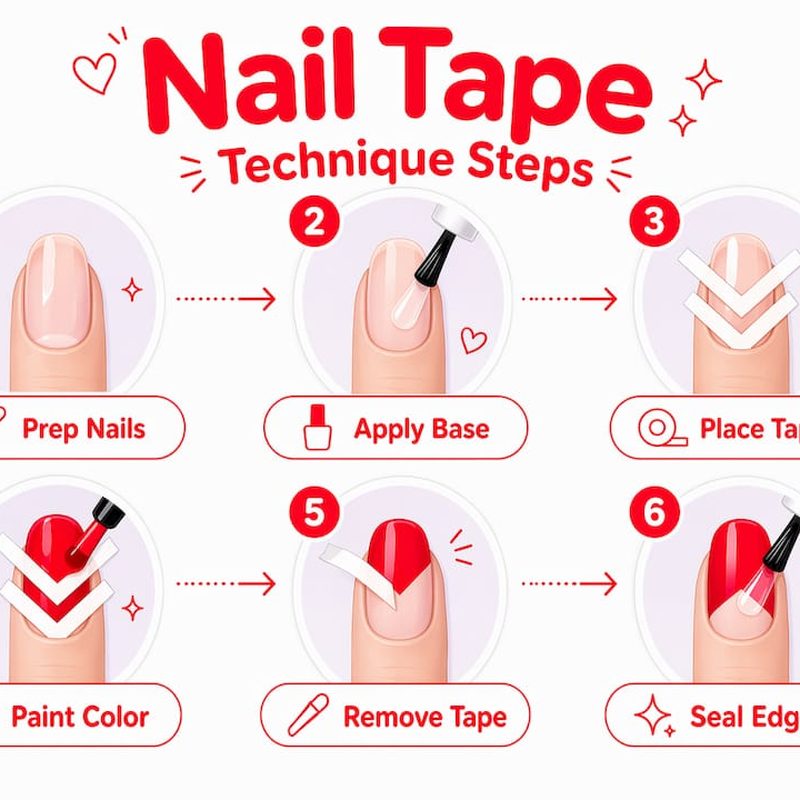
Creating polished nail designs with scotch tape starts with preparation. Begin by applying a base coat and letting it dry completely. Choose a solid base color to make your tape design pop. Once the base is dry, cut thin strips of scotch tape to create the desired shapes or lines.
Apply the tape gently onto your nails, pressing down to avoid polish bleeding underneath. Next, paint over the uncovered areas with a contrasting polish shade. Before removing the tape, allow the polish to dry but not fully set; this prevents smudging. Peel off the tape carefully to reveal crisp, geometric patterns.
Finish with a top coat to seal your artwork and add shine. Repeating this layering process can build complex designs, and experimenting with tape widths opens creative possibilities. For more advanced tools that complement tape designs, explore our Nail Art Tool Kit: Essential Tools for Creative Manicures.
Top Nail Art Scotch Tape Design Ideas to Try Now
If you’re looking for fresh inspiration, nail art scotch tape unlocks a variety of chic designs. Classic stripes and chevrons are easy to create and suit every occasion, from casual days to office-friendly looks. For a bolder statement, try crisscross patterns or diagonal cuts, which add dynamic angles and visual interest.
Minimalists can opt for negative space designs by taping off sections of the nail to leave bare areas, creating a modern and sophisticated effect. Meanwhile, layering tape with different polish colors creates depth and dimension, perfect for trendy ombré or color-blocked nails.
Pair these techniques with elegant neutral tones or vibrant hues depending on your mood or season. For a salon-ready finish that complements tape artistry, consider visiting professionals who specialize in innovative manicures, such as those at Ultimate Manicure Services at Nail Salon 84009.
Common Mistakes When Using Nail Art Scotch Tape and How to Avoid Them
While nail art scotch tape is beginner-friendly, some pitfalls can affect your results. One frequent mistake is applying tape over polish that isn’t fully dry, which can cause smudges or peeling when removing the tape. Always ensure your base coat is thoroughly set before taping.
Another issue is using tape that’s too sticky or cheap, which can damage your nail surface or leave residue. Opt for painter’s tape or nail-specific tape for a gentler application. Cutting tape strips unevenly or using thick layers of polish over tape can also blur the crisp edges you aim for.
Practicing on a spare nail or plastic surface helps build confidence and precision. If you want to expand your manicure techniques beyond tape, check our detailed post on Nails Art Brush Liner: Precision Tools for Elegant Manicures for complementary skillsets.
Choosing the Right Tape and Polish for Perfect Nail Art Scotch Tape Designs
The type of tape you use significantly impacts your design outcome. Standard scotch tape often works but can be overly sticky or leave residue. Many nail artists recommend low-tack painter’s tape or specialized nail striping tape for clean removal and less damage to polish layers.
Regarding polish, contrast is your best friend with tape designs. Matte bases with glossy top colors, or light shades under dark hues, highlight patterns more vividly. Quick-dry formulas also help speed up the layering process, reducing the risk of smudges.
Experiment with finishes such as metallics or glitters to add texture. With the right combination of tape and polish, your nail art scotch tape designs will have professional flair and durability. For additional pampering, consider pairing your new skills with professional services like those offered at Nail Salon 89118 to maintain healthy nails.
Frequently Asked Questions
Can I use regular scotch tape for nail art?
Yes, regular scotch tape can be used for nail art, but it’s often too sticky and may leave residue or peel off polish. For better results, use low-tack painter’s tape or nail striping tape designed specifically for delicate surfaces.
How do I prevent smudging when using nail art scotch tape?
To avoid smudging, make sure your base polish is completely dry before applying tape. Apply a thin layer of polish over the tape and remove the tape while the polish is still slightly wet to reveal clean lines without smears.
What polish colors work best with nail art scotch tape?
High-contrast colors work best, such as light bases with dark accents or vice versa. Matte and glossy combinations can also enhance the tape design’s visibility, making your patterns stand out.
Is nail art scotch tape suitable for professional salons?
Absolutely. Many nail salons use scotch tape techniques to create precise, intricate designs quickly. It’s a cost-effective tool that offers versatility for both simple and complex manicures.
How do I remove nail art scotch tape without ruining my manicure?
Peel the tape off slowly and gently at a 45-degree angle while the top polish is still slightly tacky but not wet. This method helps maintain sharp edges without smudging your design.
Nail art scotch tape is a game-changer for anyone looking to bring creativity and precision to their manicures. Its affordability, ease of use, and ability to produce professional-standard designs make it indispensable. Whether you’re experimenting at home or enhancing salon services, mastering nail art scotch tape opens a world of stylish possibilities. Ready to try your hand at striking tape designs? Gather your favorite polishes and start crafting your next standout manicure today.