
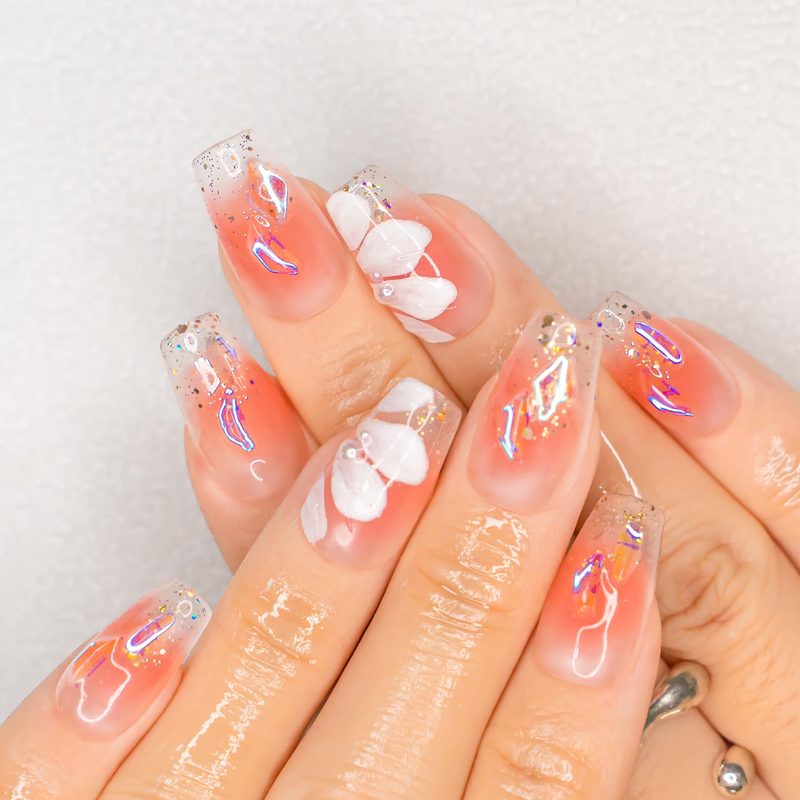
There’s something irresistibly charming about dry flowers nail art that captures the delicate beauty of nature in a manicure. If you’ve ever struggled to find a nail design that feels both unique and timeless, dry flowers nail art might be the perfect solution. The technique blends pressed botanicals with polish to create a wearable work of art that stands out without overpowering your style. Ideal for those seeking a subtle yet eye-catching look, dry flowers nail art has become a favorite in nail salons across the United States.
Whether you’re preparing for a special event or simply want to brighten your everyday manicure routine, this floral approach offers endless creative possibilities. In this article, we’ll explore everything from how to get started with dry flowers nail art to styling tips that elevate your nails to a professional level.
In this article:
What Is Dry Flowers Nail Art and Why It’s Trending
Dry flowers nail art involves embedding real, pressed flowers into a clear or colored nail base. Unlike traditional floral nail stickers or decals, this technique uses authentic botanicals, which adds texture and a natural charm that’s hard to replicate. The trend has surged in popularity as it offers a fresh alternative to painted designs and artificial embellishments.
The appeal lies in its versatility — from delicate daisies to vibrant petals, each manicure becomes a personalized piece of art. It also resonates with those who appreciate sustainability because the materials are natural and eco-friendly. Additionally, dry flowers nail art pairs well with minimalist and elaborate looks alike, making it a go-to choice for many nail art fans.
Salons have embraced the trend by offering custom designs that incorporate seasonal flowers, making your manicure feel truly unique and timely. This surge in demand has also inspired DIY enthusiasts to try their hand at creating their own floral nails at home.
Step-by-Step Guide to Creating Dry Flowers Nail Art at Home
Getting started with dry flowers nail art might seem intimidating, but with the right tools and patience, it’s very achievable. First, gather your materials: pressed or dried flowers, a clear gel or regular polish base, tweezers, and a good-quality top coat. Pressed flowers can be purchased or made at home by flattening blooms between heavy books.
Begin by applying a base coat to protect your nails. Next, place the dried flowers carefully on your nails using tweezers, arranging them in your desired pattern. Seal the design with a thick layer of clear polish or gel to protect the fragile petals. This not only adds shine but also ensures long-lasting wear.
For more inspiration, you can explore flower nail art stickers as a beginner-friendly alternative. Experimenting with colors and flower types can help you perfect your unique style.
Top Tips for Making Dry Flowers Nail Art Last Longer
One common concern with dry flowers nail art is durability. Since the flowers are delicate, they require extra care to maintain their beauty. Applying a high-quality top coat is essential; it seals the petals and prevents them from chipping or lifting. Gel top coats typically offer better longevity and a smooth finish.
Another tip is to avoid exposing your nails to harsh chemicals or excessive water, which can weaken the adhesion of the flowers. Wearing gloves during chores and moisturizing your cuticles regularly will help preserve your manicure.
If you want a professional touch, consider visiting a salon that specializes in gel or resin-based floral manicures, such as those offering resin nail art palette services. These techniques can encapsulate the flowers for a glass-like finish that lasts for weeks.
Creative Dry Flowers Nail Art Designs to Try This Season
Dry flowers nail art is highly adaptable to any season or occasion. In spring and summer, bright petals like lavender or baby’s breath add a fresh, airy vibe. Fall designs often incorporate autumnal hues — deep reds, oranges, and browns — capturing seasonal warmth. Pairing dry flowers with subtle gradients or muted bases creates a sophisticated look.
For special events, consider combining dry flowers with other embellishments such as rhinestones or foil accents. This mix adds dimension and sparkle without overshadowing the natural elements. Some styles even incorporate miniature 3D designs or abstract touches for a more avant-garde approach.
Explore simple 3D nail art designs to complement your floral manicure with subtle yet stunning enhancements, making your nails a true conversation starter.
Professional Dry Flowers Nail Art: When to Visit a Salon
While DIY nail art can be rewarding, professional salons offer expertise and tools that elevate dry flowers nail art to the next level. Skilled nail artists can ensure the flowers are perfectly pressed, placed, and sealed with long-lasting gel or resin techniques. This guarantees a flawless finish that’s difficult to replicate at home.
Salons also provide customized consultations, helping you select flower types and complementary designs that match your personal style and skin tone. They often combine dry flowers with advanced nail art tools, such as the French nail art brush or rhinestones, to create chic, salon-perfect manicures.
If you plan to wear your manicure for special occasions or want a durable design that lasts weeks, booking a professional appointment is a smart investment in your beauty routine.
Frequently Asked Questions
How long does dry flowers nail art usually last?
Dry flowers nail art typically lasts about one to two weeks with regular polish and up to three weeks or longer with gel or resin top coats. The longevity depends on how well the flowers are sealed and how much care you take to avoid water and chemical exposure.
Can I use any type of flower for dry flowers nail art?
While many flowers can be used, it’s best to choose small, flat, and well-pressed petals like baby’s breath, lavender, or daisies. Thick or bulky blooms may lift or break easily under polish. Always ensure the flowers are completely dry before application.
Is dry flowers nail art safe for natural nails?
Yes, dry flowers nail art is safe for natural nails when done with proper base and top coats. However, make sure to avoid prolonged use of harsh chemicals during removal to protect nail health. Using gentle polish removers helps maintain strong, healthy nails.
How can I remove dry flowers nail art without damaging my nails?
Removing dry flowers nail art is similar to taking off gel or regular polish. Soak your nails in acetone or polish remover while gently lifting the edges of the flowers. Avoid forceful scraping to prevent nail damage. Moisturizing your nails afterward helps restore hydration.
Can dry flowers nail art be combined with other nail art techniques?
Absolutely. Dry flowers work beautifully with embellishments like rhinestones, foil, or gel art paint. Combining techniques allows for creative, personalized designs that stand out and add texture and depth to your manicure.
Dry flowers nail art offers a unique way to express your love for nature through your manicure. Whether you prefer creating your own designs at home or opting for a professional finish, this floral trend adds elegance and freshness to your nails. Embrace the versatility and charm of dry flowers nail art for your next manicure and transform your nails into a lasting botanical masterpiece. Ready to try it yourself? Dive into floral nail art ideas and find the perfect design that speaks to your style today.